Suciô is very gratified to have received this congratulatory telegram from
Her Majesty the Queen.
Today, as promised, we're going to start a series of small-print GIMP tutorials.
They're in small print as a signal to those who know GIMP or Photoshop that they can be completely ignored.
Betta sp control plus (Ctrl++) will zoom on most browsers. (;
The Small Print Tutorial - Everything You Can Do In Paint


 I'm assuming that those who want to play along have managed to install GIMP with no problems. (If not, there's an FAQ here for Windows users.) In general with GIMP, let Google be your friend: there's a mountain of information and tutorials out there. We can't/won't add to that pile here. We just want to cover the very basics to get you up and running.
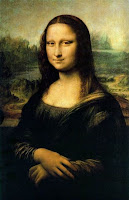
Okay, let's start with the simplest form of image manipulation ("shooping") - a little mindless graffiti. Save the image of the Mona Lisa and open her up in GIMP. I prefer to <right click> on the saved file and "Edit with GIMP" in Windows. You could instead start the GIMP application <All Programs><GIMP><Gimp 2.0> and then <file><Open>.. and browse for the file, but GIMP's Linux-like file browsing windows suck.
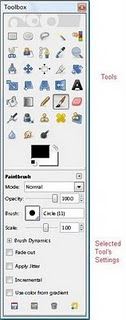
Now GIMP should have scattered a confusing mess of mini-windows all over your screen. The one we're interested in is the image window containing the Mona Lisa - it should be titled something like "Mona_Lisa.jpg-11.0 (RGB, 1 layer) 385x598 - GIMP". Make sure this image window is active and then press <Ctrl+B> to bring up the Toolbox window.
Click on the paintbrush icon
Reverting to the saved file is a bit extreme. What if you just want to undo the last brush-stroke? Well, like most Windows programs, you can type Ctrl+Z (or <edit><undo>) to undo your last change. GIMP actually stores all your actions, so you can keep pressing Ctrl+Z to undo a whole series of changes. (You can undo an undo by pressing Ctrl+Y or <edit><redo>.)
So far, all your doodles should have been in black paint (the default foreground color when GIMP start up). A couple of rows below the Paintbrush icon in your Toolbox, you'll see a pair of rectangles (black & white in the picture above). These show the current foreground and background colors.
The foreground color is, as you'd expect, the color you get when you use the paintbrush. The background color is what you get when you use the Eraser Tool
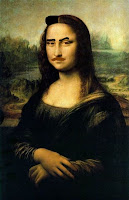
Click on the foreground color black rectangle and a fairly standard looking palette window pops up, titled "change foreground color". Play around a bit and see if you can give the lady a red nose.
While you're at it, move the Scale slider in the Tool Options window to change the brush size. (The Tool Options window is docked with the Toolbox in our picture. You may have to find it by selecting <Windows><Dockable Dialogs><Tool Options> from the image window menu.)
If you've used Microsoft paint, you should be able to figure out most of the icons in the toolbox. Things start to get different when we use layers - as we'll do tomorrow.
When you're happy with your piece,
Send a copy of your finished masterpiece to daubs@vote-sanchez.com - don't forget to include your Blogger name or the work may be mis-attributed to NaughtyGirl69@hotmail.com.


congrats on the queen following your blog
ReplyDeleteGratz on the 100th post!
ReplyDeletehaha, hilarious :D
ReplyDeleteput in a good word for me will you ?
ReplyDeleteMona doesn't look too happy with her new eyebrows ^_^
ReplyDeleteThis comment has been removed by the author.
ReplyDeleteCongrats on hitting 100 Sucio!
ReplyDeletenice turtorial and congrats from me too
ReplyDeleteHer Majesty tweets the link each time you post. her enthusiasm for you borders on giddiness.
ReplyDeleteThe queen?nice
ReplyDeletehahaha your posts get me everytime
ReplyDeleteare you next king :D
ReplyDeleteThe master artist is here, have no fear. I will download this GIMP and try your experiments.
ReplyDeleteGod save the Queen if something goes wrong.
interesting :)
ReplyDeleteReally great info!
ReplyDeleteHooray for queens!
ReplyDeleteI actually downloaded GIMp per a comment you made on someone's blog. I could use it about the same as paint, except moving the picture is a lot more complicated than in paint. I suck at imaging, which is why I learned all my horrible imaging skills in paint. :X
I look forward to your guide with GIMP, but afraid I shall not be submitting my image as I chose an image of my own to play around with.
Props, Sucio. Here's to another 100.
ReplyDelete100 posts and please, a zillion more..
ReplyDeleteand the queen huh? You are muy importante Sucio!!
Tally ho good sir!
ReplyDeleteMight want to try out GIMP. I just ''bought'' Photoshop on the internet but can't get some free time to try it out.
ReplyDeleteMona never looked better!
ReplyDeleteI did a search for 'Gimp' on the internet, and did not find what I intended. :(
ReplyDeleteI tried working on a project with Gimp the other day (after using PS for two years)
ReplyDeleteNever again will I screw around with Gimp.
Damn, gotta pay you more attention Sir. Now you have the Queen on your Jock. Kudos!
ReplyDeleteGIMP ftw. I find it very useful for adding cast members from Jersey Shore into things like The Last Supper and idyllic scenes of the Dutch countryside in the 1650s.
ReplyDeleteHer Majesty must like your blog very much!
ReplyDeleteLOL at the telegram.
ReplyDeleteThis mona lisa is remastered better than ever :D
ReplyDeleteGot a letter from the queen ,must be very proud :)
ReplyDeleteGongrats on the 100 post, keep up the great work
thanks for your comment :)
ReplyDeletei hate mona lisa picture. it´s ugly :( SORRY
xoxo
http://mar-iza.blogspot.com/
hahaha i loled
ReplyDeletehaha man, nice job on the telegram. i may submit something myself!
ReplyDeletewhy she's raising her eye brow i wonder?
ReplyDeleteFun post as always! :D
ReplyDelete