Romneycaring
Small-Print Tutorial - Getting Ahead in GIMP
Yesterday we took our first, tentative step into the wonderful world of layers. Today we'll learn how to shoop the heads of our favorite politicians onto other people's bodies.
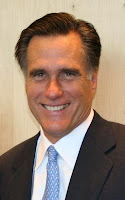
Start by saving and opening in GIMP this picture of the oleaginous former Governor of Massachusetts, Mitt Romney.
In the Layers Window (Ctrl+L), right click on the "Background" layer and select "Add Alpha Channel". This adds a whole new dimension of transparency or alpha information to the layer - like the effect we achieved with the Opacity slider yesterday, but on a pixel-by-pixel basis.
Now the layer has an alpha channel, the eraser tool will punch transparent holes rather than painting over the image with the background color.
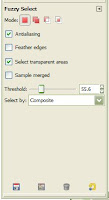
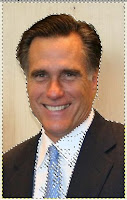
Because the background is light and Mitt's outline is well-defined, we can use Fuzzy Select Tool (the "magic wand" Toolbox icon) to select the parts of the picture we want to cut away.
Click the magic wand
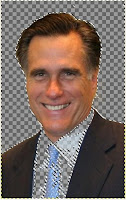
Press the <delete> key (menu <edit><clear>) and a big chunk of the background should disappear to be replaced by a grey checkerboard pattern that indicates a transparent part of the picture.
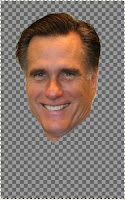
Repeat the process if necessary, clicking on Mitt's clothes and left-over bits of the background until Mitt's head is clear of the wreckage. You can then tidy up. Type Ctrl+A (<Select><All>) to make sure you have the whole layer selected (otherwise you'll be trying to edit just the last fuzzy selection). You can then use the eraser tool to tidy up. It may help to enlarge the picture: <View><Zoom><200%>. You should end up with a disembodied head floating over a grey checkerboard.
It's a good idea to save Mitt for future use. We have to save the image as a GIMP .xcf file as the more familiar .jpg format doesn't understand alpha channels. So, <File><Save As>"Mitt_Romney.xcf".
Now time for the host body. Save and edit in GIMP Hot_Mormon_Boy.jpg.
(Courtesy of MormonBoyz.com - W.T.F.!?)
Select the image window for "Hot_Mormon_Boy", Ctrl+L to bring up its layers window and click the new layer icon Back in the "Mitt_Romney.xcf" image window, Ctrl+A (<Select><All>) and Ctrl+C (<Edit><Copy>). Back again to "Hot_Mormon_Boy.jpg" and Ctrl+V (<Edit><Paste>) to paste a giant Mitt head "floating" over the new transparent "Head" layer.
We need to re-size Mitt. Type Shift+T (<Tools><Transform Tools><Scale>) to bring up the Scale dialog. Make sure the chain linking the Width and Height fields is joined (click it a few times to see the difference) and then change the Width field from the starting 382 to (say) 120. Press tab and you should see that the Height value changes automatically from 611 to 192 (this is because the fields are linked).
We now want to move Mitt's resized head into place: Shift+M (<Tools><Transform Tools><Move>) or click the Move Tool icon
Use the rotate tool: Shift+R (<Tools><Transform Tools><Rotate>) to tilt his head enough to cover the boy's ear while being joined at the neck. After a bit of fiddling, Mitt should be in place and you can anchor the floating selection by clicking the anchor icon at the bottom of the layers window. (TIP: GIMP restricts what you can do while a floating selection is active. If your clicks don't seem to be doing anything check in the layers dialog to see whether you're "anchored".)
Use the eraser tool to tidy away any unwanted wattles and you should have an image like the one at the start of this post. Save as an ".xcf" so you can work on the image again and then save as a ".jpg" so you have a publishable image.
Congratulations : you are now an accomplished satirical artist. The Hogarth of our times.
Send copies of any particularly offensive pictures you make to:


Thanks Sucio!
ReplyDeletelol. Thanks. Great pic :D
ReplyDeleteRofl, but Sucio... How exactly did you stumble upon that Mormon picture???
ReplyDeleteHahaah great shoop! and easy follow technique so cheers
ReplyDeleteLOLOLOL Love it! Thanks for the tutorial, kinda overwhelming but I'm sure the more I use it I'll get it. :)
ReplyDeletelmao that is a very creepy looking mormon
ReplyDeletethis is so disturbing...
ReplyDeletelol :D nice picture
ReplyDeletehaha, thanks for that :D
ReplyDeletei really gotta get on some edit skills
ReplyDeleteI bet Romney has a pr0n folder full of bubbled pictures of McCain's wife...
ReplyDeleteLOL THanks man :)
ReplyDeletelooks sooo... professional :P
ReplyDeletehttp://kind-of-informational.blogspot.com/
haha crazy man :) I did this many times, only thing i would suggest is that you alternate the skin color a bit to make the face and the rest of the skin match :) thus looking more realistic
ReplyDeletehaha nice man
ReplyDeleteI just love that this is educational, as well. Of course, I think we already expected that of him so the picture isn't such a reach.
ReplyDeletehaha that's what I call photoshop skills :)
ReplyDeletei've been photoshopping a guy with a fur hat onto pictures for a while now, i don't think anyone's noticed though...
ReplyDeleteWait, there is actually mormon porn? Like, they specify the religion?
ReplyDeleteI... I'm actually not surprised by this.
Nice post
ReplyDeleteCheck me out
http://dc-hair-laserremoval-washington.blogspot.com/
Oi Vey!! I am so not techno-savvy.. Do you do tutoring?
ReplyDeleteNow can you shop some "magic Mormon underwear" on him?
ReplyDeletehttp://en.wikipedia.org/wiki/Temple_garment
Very funny pic. The expression makes it the greatest.
ReplyDeleteNice! Gotta love some gimp use.
ReplyDeleteman great turtorial
ReplyDeletethanks
mormonboyz.com...
ReplyDeleteyou know i have to visit this now...
hahaha wow...
ReplyDeletehahahahhaha
ReplyDeleteThis looks shooped to me, and I can tell because of the pixels and I have seen a few shops in my time.
ReplyDeletewhat program do you use?
ReplyDeleteI am feeling more educated .
ReplyDeleteWhy are you doing this to me ?
LMAO at Romneycaring
ReplyDeleteHaha wow, nice read xD
ReplyDeleteLmao! definatly looks shoop'd ;D
ReplyDeleteInteresting though irregardless!
All these little photo editing tricks could definitely come in handy!
ReplyDeletetime to start defaming.
ReplyDeletehaha. thanks
ReplyDeleteHehe, I used to do this in photoshoop
ReplyDeleteAlright, I'm late, but I got his head on the Mona Lisa. Funny, I never thought this is how I would learn to manipulate images with my drawpad.
ReplyDeleteYou got some great skills with pixels I'll give you that :)
ReplyDeleteHaha, thanks, I will be having some fun with this! Also, I didn't
ReplyDeleterealize i could save things for later to for editing. I didn't look around much.
ReplyDeleteAnd this two part reply is brought to you by laptop error! Thanks laptop error!